The Provident Homemaker
  • Recipes and Info
    • Making Bread
  • My Blog
  • Favorite Resources
  • Documents and Files
  • 52 Weeks of Building Storage

Week 45- Beans, and Aunt Gen

2/22/2020

3 Comments

 
Picture
To help with building your year's supply (this is Week 19 of 26), see this chart. 
 
This week I’ve been thinking a lot about old-time things.  My aunt Gen (short for Genevieve) died on Tuesday. She’s my great-aunt, and her last remaining sibling on earth is my grandma. They and their brothers were born in the Mormon colonies in Mexico. All of them lived well past 90 years old. Gen was born in 1918, the year of the great Flu Pandemic, just after her family returned to Mexico after being evacuated during the Mexican Revolution. She was one tough and smart cookie, and one of the kindest people I know. She grew up without electricity, running water, or indoor plumbing. She was a young mother in the last years of the Great Depression. She cooked over fire and charcoal; her first home as a bride had a brick stove with a hole on top in which to put charcoal. She got herself a 5-gallon metal bucket, turned it on its side, cut a door, set a rack inside it, and placed it over that hole. That was her oven.  “I couldn’t bake very large of loaves,” she said, “but it worked.”  The first car her family owned was purchased when she was in her mid-30s.
 
When I was younger, she lived about halfway between my family’s house in Utah and my grandparents’ home in El Paso.  We’d often stop and spend the night with Aunt Gen. Even in the 80s and 90s, she had no TV in the house, which made for lots of times sitting and telling stories or playing games. And she always—always!—made us lemon sugar cookies.  (Maybe I’ll post that recipe soon.  Twenty years ago or so I tried to duplicate it several times-- and failed—until I called her one day and learned the secret.)

​She moved next door to her son in Utah about 30 years ago and had been there ever since, gardening and canning with his wife and children, teaching the kids to crochet, bake apple pies, and shuck corn. When she was in her 80s, they found her one day on the roof, leaning over the edge with a big straw hat on. She was cleaning out the rain gutter with a running hose and a screwdriver to loosen the packed leaves.  She was sick her last little while—though even in her last ten years she didn’t take a single prescription medication. She had a homemade cure for everything-- and they worked!  ("For a bee sting, soak a tomato leaf in rubbing alcohol, then put it on the sting.")

What a lot of things she saw and did in her 101 years!  And her older brother, Uncle Elvin, made it even longer. He was 103. 
​
I sometimes wonder if and when we'll need those same skills and ingenuity that her generation had. 
 
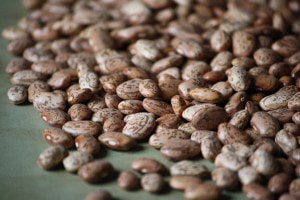
One food she was very familiar with was beans. They were a cheap, filling, healthy source of protein, B vitamins, iron, calcium, and magnesium. She and I both learned from her mom (my great-grandma Lillie) how to make the most delicious caramel for dipping apples, spreading on cakes, or digging into with a spoon. It didn’t have beans in it but was served at many bean meals. This is why:

She’d take a can of sweetened condensed milk, remove the label, wash the can, and set it in the bottom of a big pot. A stockpot type one, taller than the can was. Then she’d pour in some dry beans, carefully picked through to remove any little rocks or dirt clods, measure in some salt, and add enough water to cover the top of the can. Then the beans would be simmered for three or four hours until they softened through. (We didn’t ever let the pot boil dry, or the can could possibly have exploded.) When the beans were done, the caramel was done.  We had to be patient while the can cooled down enough to open without spurting hot caramel on us. And the wait was worth it.
 
Do you wonder what the differences are between all the different kinds of beans?  They’re all from the same sort of plant, and can be interchanged pretty freely. There are different sizes, colors, textures, and flavors.  For that information, see the first two pages of the USU publication, Dry Beans and Peas. It also tells you how to cook them, whether you prefer the quick-cook method, the overnight soak method, or using a pressure cooker, slow cooker, stove top, or microwave.

If you’d like more old-time recipes, there are lots. Let's look at two that Aunt Gen would likely have been familiar with while raising her children.
 
“99 Ways to Share the Meat” is a brochure created in 1943 to help Americans cook under the new meat food rationing. 

It includes advice on what to put with beans to flavor them.  For we modern folks who might not know, ‘salt pork’ is bacon that is cut thick like steak, rather than sliced.  Bacon is a great substitute.  Same flavor, same cut, different shape.

85. For plain cooked beans, soak, simmer slowly in a covered pan. Flavor with something salt[y], sour, fresh, crisp, bright, or spicy.

86. Bake beans long and slowly.  Good seasonings are molasses, mustard, salt pork, onion.

87. For better bean soup, add finely chopped peanuts… tomatoes… carrots… or a few slices of frankfurter or bits of cooked ham or sausage.

88. Hearty bean sandwich fillings. Combine baked beans with onion, pickle, relish, or catsup… Moisten with salad dressings… Combine chopped peanuts and baked beans.

97. Press cooked [beans] through a coarse sieve or grind in a food grinder
[food processor] for pulp to make soup, croquettes, loaves, souffles.

98. Use cold [bean] pulp as filling for sandwiches.  Mix with chopped onion and enough salad dressing
[we’re talking mayo or Miracle Whip type stuff here] or milk to make it easy to spread.

Picture
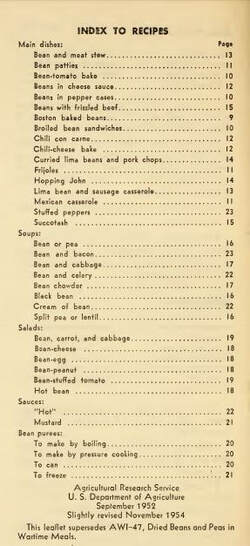
There was a WWII-era, government-sponsored recipe book called “Dried Beans and Peas in WarTime Meals”. I haven't managed to find anything but references to it, but did find its replacement from 1952, a 28-page booklet called Dry Beans, Peas, Lentils …modern cookery. The photo to the left is the index to those recipes.

The pamphlet begins by telling us, “Dry beans and their close cousins, the dry peas and lentils, are food bargains, budget-wise and nutritionwise.  When buying, you can figure that a pound of one of these dry foods will provide 7 to 9 servings.”  And then it tells about nutrition and getting the best protein value from them, which ones need soaked ahead of time, how much water to use when cooking them, and shortcuts for soaking and boiling them.  Of course, recipes follow. (It also tells you how to can bean puree; disregard that, as it doesn’t fit within current USDA safety guidelines.)
 
What bean recipes do you love?

3 Comments

Week 44- A Perspective on Modern Conveniences

2/15/2020

0 Comments

 
 To help with building your year's supply (this is Week 18 of 26), see this chart. 
 
What do you take for granted?
 
A middle-aged woman was working in the kitchen with her grandmother to prepare a wonderful family dinner. The grandmother thoughtfully asked, “Tell me, if you could have only one of these modern conveniences we have here in my kitchen, which one would it be?” Her granddaughter took her time in answering, evaluating all the pros and cons as she moved around the kitchen. She noted the stove, the dishwasher, blender, etc., thinking what it would be like without them. Pleased with her careful analysis, finally she replied, “I think I would have to choose the fridge. What about you?”
The grandmother chuckled. “I would choose running water every time.”
 
That story came to mind as I was reading through a recipe book published in 1909 by Baker's Chocolate. The instructions included a wooden pail, crushed ice, and a wet piece of carpet. The recipe was written nearly two decades before the first widely-used refrigerator was invented.  Way before electric or gas stovetops. And before many people had pipes that brought water to their house and took the used stuff away. My mom is still in her 60s, but grew up with an outhouse and hauling water from the creek.
Modern conveniences-- they're more recent than we tend to think. 

Take a look at the recipe below. It should help you start thinking about how you'd cook--clean--bake-- if those modern conveniences weren't available for a while.  A good preparedness adage is 'If it's important to you, have two or three ways in mind to be able to do it.' That goes for heat, light, refrigeration, having clean water, and more.
Picture
CHOCOLATE MOUSSE
 
Put a three-quart mould in a wooden pail, first lining the bottom with fine ice and a thin layer of coarse salt. Pack the space between the mould and the pail solidly with fine ice and coarse salt, using two quarts of salt and ice enough to fill the space.

Whip one quart of cream, and drain it in a sieve. Whip again all the cream that drains through.
 
Put in a small pan one ounce of Walter Baker & Co.'s Premium No. 1 Chocolate, three tablespoons of sugar and one of boiling water, and stir over a hot fire until smooth and glossy. Add three tablespoonfuls of cream.

Sprinkle a cupful of powdered sugar over the whipped cream. Pour the chocolate in a thin stream into the cream, and stir gently until well mixed. Wipe out the chilled mould, and turn the cream into it.

Cover, and then place a little ice lightly on top. Wet a piece of carpet in water, and cover the top of the pail. Set away for three or four ours; then take the mould from the ice, dip it in cold water, wipe, and then turn the mousse out on a flat dish.
_______
 
The whole book is found here: https://d.lib.msu.edu/fa/14/pages
Picture
0 Comments

Building an Earth Oven

4/6/2011

4 Comments

 
Bakeries boast if they use a brick oven for their breads.  Why? 
These ovens cook using multiple forms of heat- conduction, radiant, and direct heat.  Add some steam, and you get some seriously fabulous crust on your bread.  Pizza?  You better believe it.  You cook it at an ideal 700 degrees Fahrenheit; a thin-crust pizza is done after only 3 minutes, emerging bubbling and with a lovely smoky flavor.
Cook anything in this that you would in a regular oven.  And when it's cooled down, it can remain the ideal temperature for incubating yogurt, clear through the night.

This type of oven has the fire built on the cooking floor.  Fill the oven with wood, light it, and let it burn for 2-4 hours, until the oven walls glow white-hot.  My thermometer doesn't measure high enough to know how hot this is; it only measures to about 1400 degrees!

Scrape out the fire, quickly scrub off the oven floor, and let the heat "soak"- you're letting the temperature equalize all over the interior.  When the temperature has dropped to what you want, add some steam (for bread baking) by swabbing the oven floor with a wet cloth or mop.  Load it up with your bread, or turkey, or squash, potatoes, casserole, or whatever-- and close the oven door to bake.


It's called an earth oven because it's made using packed earth; in other words, mud.  This makes it very affordable!  I highly recommend Kiko Denzer's book, Build Your Own Earth Oven.  It was invaluable to me, and has many excellent suggestions for making do with what you have locally.  He also has a great overview on Mother Earth News, right here.
You can make a fabulous oven out of nothing but dirt, sand, chopped hay or leaves, and some bricks or tiles.  There are even simpler versions around, using just rocks and dirt. 

Since I opted for several upgrades on this oven, it cost about $200 total. 

Items I got for free:
cinderblocks (a stack was in the yard when we bought the house)
sand (huge sandbox, in the photos' background)
bricks for the oven face

Items purchased included:
bags of cement for a foundation pad
rebar for reinforcing the foundation
rebar for reinforcing the cinder blocks
cement for reinforcing cinder block construction
one used steel entry door
one circular saw blade to cut the steel entry door
about 45 firebricks
1/2 cubic yard of dirt
a couple small buckets of refractory cement
portland cement and a bag of vermiculite, for the insulation layer.
12" of 1" diameter steel electrical duct tubing
one dial-gauge thermometer
mortar, used with the oven face, and some gaps in the cinderblocks

If the pictures below seem overwhelming, here are the steps in short form- prepare an insulated base for the oven; build a sand dome on it; pack moist earth all around  the dome (thermal layer); pack insulation around the thermal layer.  Finish with a breatheable plaster, for longest-lasting results.  The doorway can be molded in as you go, or carved out afterwards.

Picture
Sorry, I didn't take any photos before this point.  I poured a slightly sloped foundation pad, reinforced it with rebar, and dry-stacked cinderblocks, leaving some slots for drainage between cinderblocks at the low part (the back) of the pad.  To reinforce the cinderblock walls, I stuck rebar down every 2-3 cells, then filled those (with rebar) with cement.  (I did this because I have roughhousing boys, and live nearby a major  fault line.)  In this photo, half of it is in shadow; the oven floor is meant to be just above waist-high.  The area under the oven is to store wood.  To support the block over the opening, I found a piece of hardi-backer (cement) board.  The top course of cinderblocks were narrower than the ones below, which gave me a spot to place some kind of support for the oven floor.  I bought a used steel entry door and a special saw blade, and cut the door to fit.  On top of that went a layer of sand, for insulation, filled even with the top of the blocks (packed really well).  Firebricks were set snugly together for the oven floor, and a circle scribed in chalk.  This would be the inner diameter of the oven.

Picture
The sand was free, but it had lots of rocks- and small toys- mixed with it.  A frame with 1/2" hardware cloth stapled to it worked well for sifting.  If you notice my expanding waist in the next photos, it's because I was 8 months pregnant when I started this project, and 9 months along when it finished.

Picture
Build a dome of moist sand; this will be your oven's hollow part later.  There's a height-to-width radio that works most efficiently, but about ratio will give you an oven that cooks. 
The pipe in the middle was to show my required finished height.  Pack the sand really well, or it won't support the weight you're about to put on it.

TIP:  this takes a TON of sand, which you'll have to scoop out later.  At about this point I started added cinderblocks and other large items to the dome. That saved a lot of scooping.  And sifting.

Picture
Once the dome is as big as you want, pack and smooth it as best you can. A little water helps, and a board to press and smooth. 
If you want a layer of refractory cement, to help hold heat and protect the inside walls, add it now.  A thin layer, 1/8 - 1/4 " thick, is all you need.

Picture
Once that's in place, mix your dirt- er, I mean 'earth'.  It needs to be moist enough to hold together, but not so wet it squishes when you pack it.  You can mix it on a tarp with your feet, or in a wheelbarrow with a shovel.  Starting at the bottom, tightly pack this earth in a layer about 4" high, and the width of your hand.  Use your closed fist to pack it, and a small bucket of the dirt to keep it handy. Spiral your way up the dome, always packing hard onto the layer below.  Don't apply any pressure to the sand dome.  Let this sit for a few days, then scoop out all the sand.

Picture
Once the earth layer is complete, add an insulation layer in the same way as the earth layer.  This makes a huge difference in how well your oven retains heat.  You can use more mud, mixed with any organic material- chopped leaves, straw, horse hair, you name it.  They will burn out when the oven heats up, leaving insulating air pockets behind.  This oven's insulation is a mixture of portland cement and vermiculite; I wanted it to be very durable.  Shape this layer with your oven door in place so it fits. 

The pipe sticking out in front of my face is a piece of metal conduit with a fitting to screw on the temperature gauge.  Next time I'll put it down close to the oven floor, which is where the bread bakes.  There's actually about 100-degree (Fahrenheit) difference between the oven floor and where the oven probe sits. 

Picture
If you want the oven to dry with as few cracks as possible, build a low fire and let it burn for several hours.


Picture
For a brick face-  a chisel and hammer yielded a really poor keystone for the arch.  Improvise to support the arch until it dries.   A bucket and cinderblock came to the rescue here.

Picture
The completed oven. 

Picture
More completed, with flagstones set around it. 

When using the oven, keep a bucket of water handy. 

I still intend to make a roof for it- Utah winters are rough on it.  There are two eye bolts embedded in the top of the oven- all it will take is a piece of sheet metal, creased at the center to make a sloping roof, and two slits cut in it to slip over the eye bolts.  Twist them, and it should stay on.

4 Comments

Cheap solar cooker; Oven Fried Potatoes

11/6/2010

0 Comments

 
Picture
The BYU Solar Cooker- designed to work well with whatever materials you have on hand to build with.  This one uses cardboard, foil, and a box to support it, though a bucket or some rocks would work too.

(Originally from 7/01/10)

I'm excited right now because this idea works!  Last week I cooked some carrot cake in a really
cheap and simple solar cooker. I got a windowshade at D.I. for $1.50, used a canning jar spray-painted black for a cooking pot, and fastened the edges of the shade with  metal brads (like you use in kids’ projects).  I set it outside, angled it so my shade fell right into from in front, and left it for an hour.  Yummy!   Not only that, but my 'carrot cake' was just my simple muffin recipe with cinnamon, raisins, and a handful of dried (not reconstituted, either) carrots from the Family Home Storage Center. 


So how did I make it?  Mine looked like these two solar cookers- the first uses that car windowshade, and the second just uses cardboard and aluminum foil.  Both designs are VERY similar, they just use different materials.  Use what you have; if you didn’t have aluminum foil but had one of those Mylar emergency blankets, you could use that.  Solar cooking works best from March through October, though you can still use your solar cooker in the cooler months.  It helps to put the cooker against a south-facing wall, to get more reflected energy, during the ‘off’ months.  Here’s the first link:  http://www.solarcooking.org/plans/windshield-cooker.htm .  The other version (from Dr. Steven Jones @ BYU) is made with cardboard and aluminum foil; the website has great info on why, how, and what to cook, including cooking times.  You can even make ICE with a solar cooker.  No kidding. It's at  http://solarcooking.org/plans/funnel.htm  This link also has cooking times for different types of food.


To cook a meal for a family, one way to cook a bigger amount is just use a bigger container.   Maybe layer multiple containers? Or layer food in one container. Usually not every part of a meal needs cooked, anyway.  I have pans that stack together, to cook things simultaneously.  You could also use a gallon-sized glass jar painted black; I got a couple from a store that makes chocolates.  They got the jars when full of maraschino cherries, and sold them to me (empty) for $1.  But any container that is dark (black or dark blue) can be cooked in.  Maybe use a Dutch Oven or enameled cooking pot.

And if you wonder why the instructions for the foil/cardboard solar cooker say to put a wooden block under the jar/pan before cooking, I found out why-  it's to keep heat from escaping out from underneath.  The first time I cooked with this, my carrot cake was a little underdone on the bottom.  Apparently that's why.  

 
I have also baked cookies in my van window.  I was told that it has to be at least 95 degrees outside for that to work, it gets to about 250 degrees in the window that way.  I tried it on  a slightly cooler day (93?) and it worked, barely.  Now if you put the food next to the glass, and put a sunshade BEHIND the food, on the dashboard, that might give you a much warmer (and bigger) cooking spot. Hopefully it doesn't bake your dashboard!  The glass IS tempered, though, so that part should be OK. 


You can also use a vehicle for dehydrating food because it gets so hot. Just be sure to open windows a bit for airflow. ( I haven't tried that one yet, though.)  You can use clean window screens or an old screen door for a drying tray.  Cookie sheets work, too, but drying will take a little longer because the bottom can’t get air.

 * * * * * * *
Those of you who planted potatoes this year probably now have those delicious, creamy ‘new potatoes’ ready.  (Or just use whatever kind from the store….)  Maybe try cooking these in your solar oven!
 
Oven-Fried Potatoes 

2-10  potatoes- however many you want   
1-2   Tbsp.   vegetable oil   
Seasoned salt, dry ranch dressing mix, or Parmesan cheese   

Heat oven to 450 degrees.  Wash potatoes well, then cut into strips or wedges about 1/4-1/2-inch thick , unless they're 'new potatoes'; leave those whole or cut into bite-sized pieces.  Put them all in a bowl, drizzle the oil over them, and then sprinkle a good amount of seasoned salt, dressing mix, or Parmesan cheese over the top.  Stir well and add more salt or cheese if it looks like they need it.  Spread potatoes out on an ungreased cookie sheet.  Bake for about 15-30 minutes or until lightly browned and tender when you poke the thickest one with a fork.  

 
0 Comments

    Need a Search bar?
    One day I may upgrade my website-- but until then, use your web browser search bar. Type in my web address and what you're looking for, like this-- 
    www.theprovidenthomemaker.com  pumpkin --  and you should get results.


    Author

    I'm a disciple of Christ, a member of the Church of Jesus Christ of Latter-day Saints, a family-defending, homemaking, and homeschooling mom of eight children, two of whom sometimes can't have milk or wheat. Growing up on a farm in a high mountain valley, my parents taught me to 'make do', work hard, smile, and help others.  I love cooking, learning, growing food and flowers, picking tomatoes, and making gingerbread houses --which CAN be made allergy-friendly-- with my children.  I hope you find something to help you on my site!

    Archives

    April 2024
    July 2023
    April 2022
    September 2021
    March 2021
    December 2020
    April 2020
    March 2020
    February 2020
    January 2020
    December 2019
    November 2019
    October 2019
    September 2019
    August 2019
    July 2019
    June 2019
    May 2019
    April 2019
    January 2016
    November 2015
    October 2015
    September 2015
    March 2015
    February 2015
    November 2014
    October 2014
    September 2014
    August 2014
    July 2014
    June 2014
    May 2014
    April 2014
    March 2014
    February 2014
    January 2014
    December 2013
    November 2013
    October 2013
    September 2013
    August 2013
    July 2013
    June 2013
    May 2013
    April 2013
    March 2013
    February 2013
    January 2013
    December 2012
    November 2012
    October 2012
    September 2012
    August 2012
    July 2012
    June 2012
    May 2012
    April 2012
    March 2012
    February 2012
    January 2012
    December 2011
    November 2011
    October 2011
    September 2011
    August 2011
    July 2011
    June 2011
    May 2011
    April 2011
    March 2011
    February 2011
    January 2011
    December 2010
    November 2010
    October 2010
    September 2010

    Categories

    All
    Alcohol
    Alternate Cooking
    Appearances
    Apple
    Apricots
    April Fools
    Aprons
    Bananas
    Beans
    Beef
    Beets
    Bench
    Beverages
    Bonnet
    Bread
    Breakfast
    Budget
    Budgeting
    Cake
    Candy
    Canning
    Carrots
    Cheese
    Chicken
    Children
    Chocolate
    Christmas
    Cleaning
    Coconut
    Comfrey
    Common Core
    Constitution
    Cookbook
    Cookies
    Cooking Oil
    Crafts
    Dairy Substitutions
    Dehydrating
    Dessert
    Dried Fruit
    Earth Oven
    Earthquake
    Easter
    Edible Weeds
    Eggs
    Emergency Prep
    Essential Oils
    Faith
    Family Home Evening
    Fertilizing
    Food Storage
    Fourth Of July
    Freezer
    Frosting
    Fudge
    Garden
    Gardening
    Gingerbread
    Gluten
    Gluten Free
    Gold
    Government
    Grains
    Gratitude
    Hat
    Herbs
    Home Remedies
    Home Repairs
    Homeschool
    Home Storage
    Honey
    Hope
    Inflation
    Leftovers
    Legumes
    Lemon
    Main Dishes
    Mixes
    Mothers
    Noah
    Non Artificial Colors
    Non-artificial Colors
    Nuts
    Oats
    Oil
    Orange
    Paint
    Peaches
    Pear
    Pie
    Pizza
    Plums
    Poem
    Popcorn
    Pork
    Potatoes
    Powdered Milk
    Prayer
    Preparedness
    Projects
    Prophecy
    Pruning
    Pumpkin
    Quick Bread
    Rhubarb
    Rice
    Salad
    Salt
    Sauces
    Self Reliance
    Self-reliance
    Sewing
    Shelf Life
    Shelves
    Sky
    Smoothie
    Snacks
    Soup
    Spices Or Seasonings
    Squash
    Strawberries
    Substitutions
    Sugar
    Summer Fun
    Three Month Supply
    Time
    Tomatoes
    Trees
    Truffles
    T-shirts
    Tuna
    Ultra Gel
    Valentine\'s Day
    Vegetables
    Water
    Watermelon
    Wheat
    Work
    Year Supply
    Zucchini

    RSS Feed

Web Hosting by iPage